
Interface basics
1.1 Pooly Projects
A Pooly project is a complete song workspace saved as a .pool file. Everything that defines your music lives inside it: tracks and their device chains, patterns, clips in the launcher and arrangement, scenes, mixer settings, tempo, and project key and scale. When you open a project, Pooly loads the full song and returns you to the main editing view you were using last.
The Projects screen shows every saved project as a card, pulled from your configured save location (internal app storage or a custom folder on your device). Tap a card to open the project. Each card also offers actions such as preview playback, rename, duplicate, delete, export, and open-in-folder. Use the New Project button in the footer to create a fresh song with default settings.
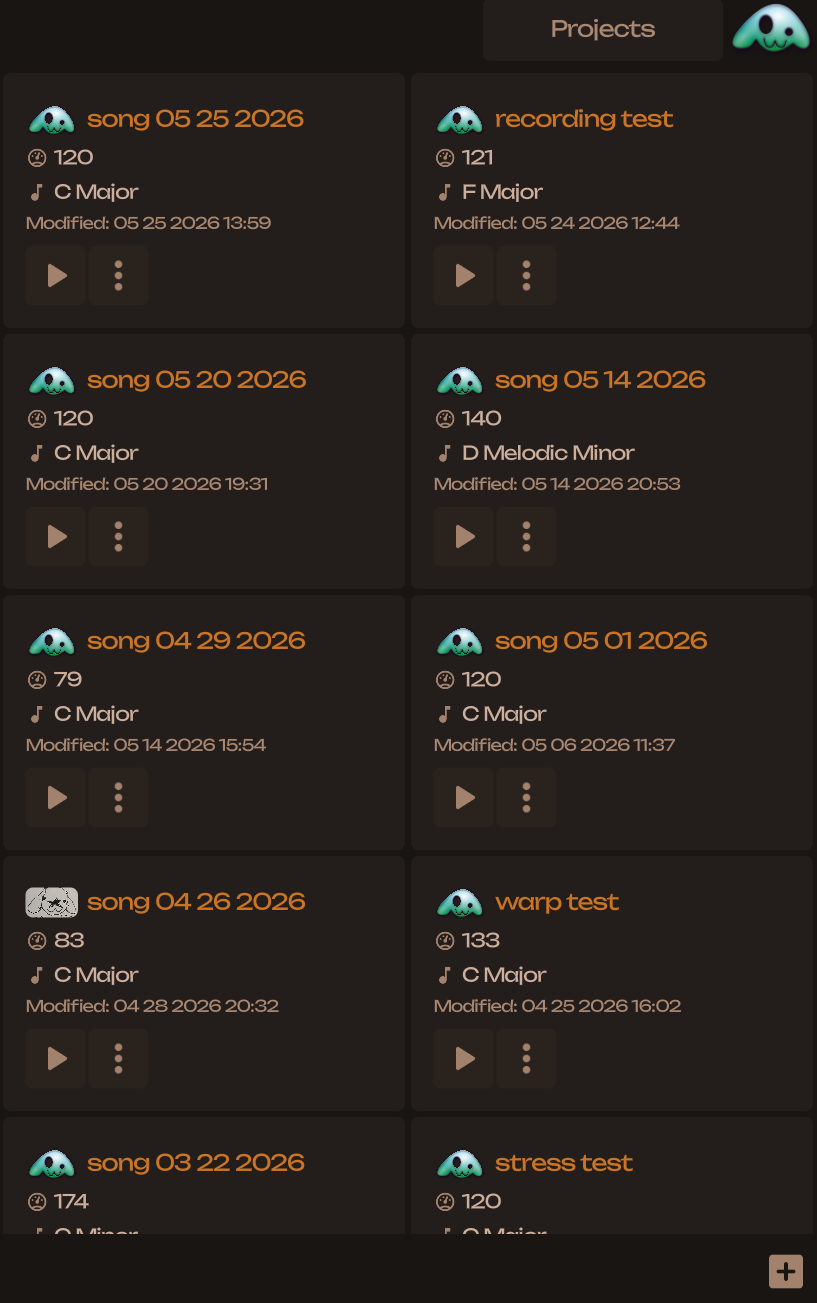
Pooly tracks unsaved changes while you work and saves before exiting the application. If save on exit is disabled (via the application menu) pooly prompts you to save before discarding the projects changes. New projects are populated with a randomized track selection so you can begin creating immediately.
1.2 Header Bar
The header bar sits at the top of the Pooly window and gives you context about where you are and quick access to global controls. Its contents change depending on the active view.
In most editing views the header shows a Back button, a title, and the song avatar. The title is static on some screens (for example “Projects” or “Mixer”) and dynamic on others: in Detail View it shows the current track or instrument name, and in the launcher or arranger it reflects your current selection. Tapping the song avatar opens Settings.

When you are inside a project, the back button usually returns to the previous view; from the Launcher or Arranger it switches to the Project Selection View and takes you back to the Projects screen. An Main View toggle switches between the Launcher and the Arrangement view, choosing horizontal or vertical layout based on device orientation.
1.3 Footer Bar
The footer bar is Pooly’s persistent control strip at the bottom of the window. Like the header, it is built dynamically: each view exposes a footer configuration that turns individual buttons on or off. This keeps the interface focused—Detail View shows pattern-editing tools, the Projects screen shows New Project, and the Launcher exposes the scene-launcher toggle—while shared controls stay in familiar places across views.
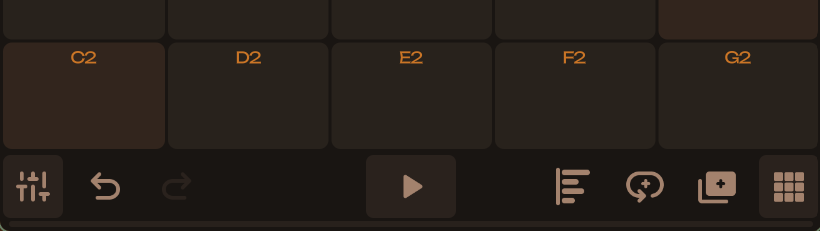
The most common footer controls are Play, Undo, Redo, and Mixer. Play toggles transport for the current project. Undo and redo step through the edit history; buttons disable automatically when no action is available. Mixer opens Mixer View where you adjust per-track volume, pan, mute, and solo. In Detail View, additional footer buttons appear for pattern operations such as halving or doubling length, duplicating the pattern, and quantizing notes—these are disabled when you are on an empty track with no pattern content yet.
Other footer buttons appear contextually. The Main View toggle (also available in the header) switches between launcher and timeline views. A Pattern Dock button toggles the arrangement pattern dock in horizontal or vertical arrangement layouts. Pad Options opens performance-pad settings in Detail View. On the Projects screen, the footer is simplified to creation and navigation affordances rather than transport controls.
1.4 Undo History
Pooly records your edits in a structured undo history. Each undo step is a state change grouping one or more reversible actions.
The footer Undo and Redo buttons are available in most editing views. They enable and disable automatically based on whether history exists in the respective direction. Pressing undo reverts the most recent committed change; redo replays a change you stepped back over. A notice popup briefly describes what happened, using the operation label stored with that history entry (for example “Duplicate Pattern” or a parameter-specific description).
The history stack holds up to 40 steps. Rapid successive edits to the same parameter can accumulate into a single undo step when they occur within a short time window, so dragging a slider does not consume the entire history. Starting a new edit after undo clears the redo branch—the future stack is discarded.
1.5 Arrangement and Launcher
Pooly gives you two complementary views of the same project. The Launcher is a session-style matrix: columns are tracks, rows are scenes, and cells hold launcher clips you trigger in real time. It is the default working view when you open a project—ideal for trying ideas, launching scenes, and building sections before committing to a fixed timeline. Track headers run along the bottom; scene launch buttons sit in a column you can toggle from the footer.
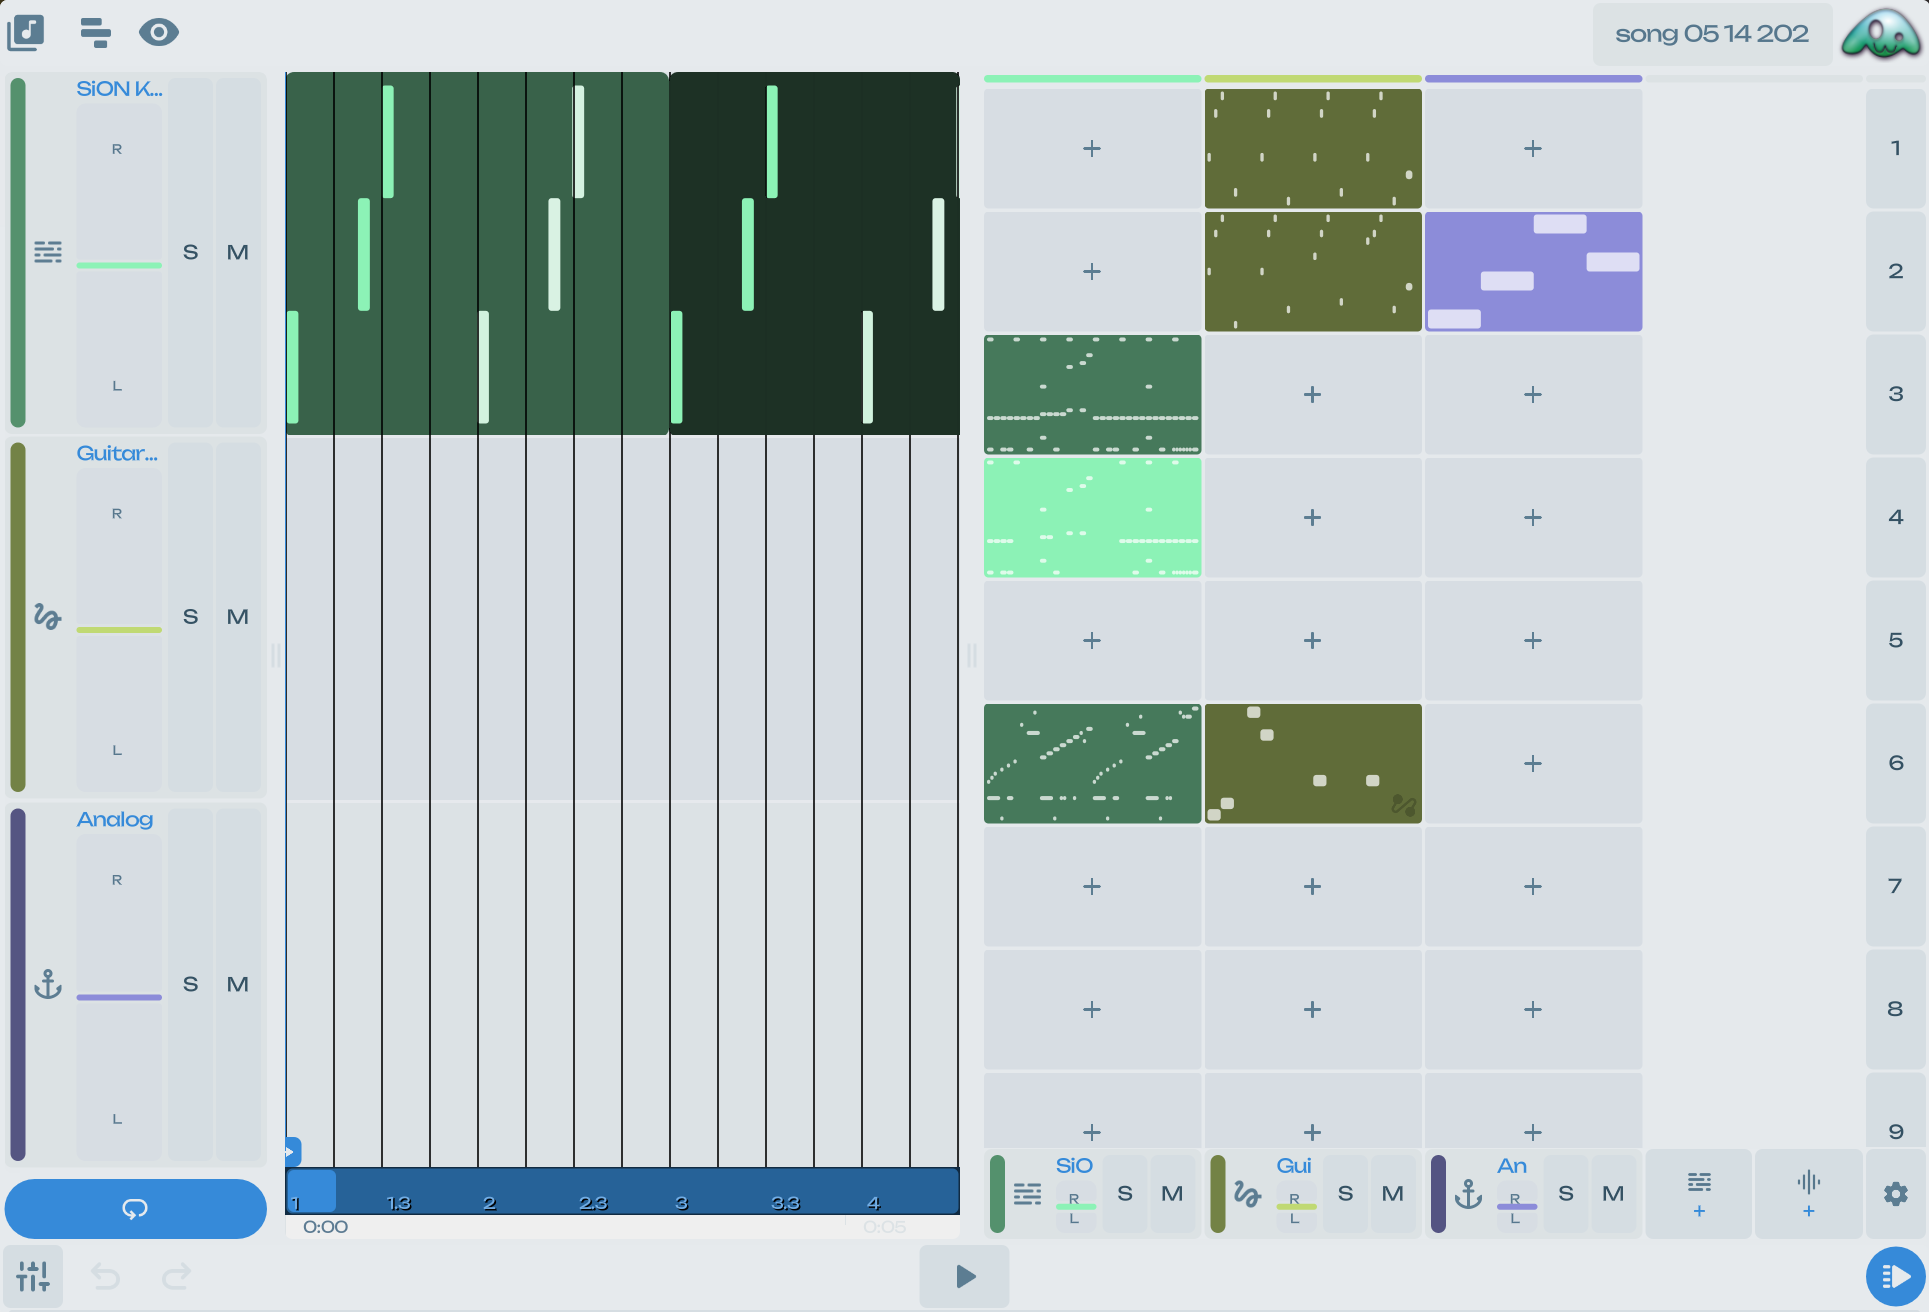
The Arranger is a linear timeline view where clips sit at positions across horizontal (landscape) or vertical (portrait) layouts. You can switch between launcher and arrangement with the header arrangement button; portrait devices open the vertical arrangement, landscape opens the horizontal one. Resizing Poolys window can also change the arrangement layout if enabled in settings. The arrangement exposes a clip map with a draggable playhead, loop controls.
Both views share the same underlying project model. Launcher clips and arranger clips are distinct clip kinds referencing the same pattern pool—placing material on the timeline does not destroy launcher slots, and duplicating or editing patterns can be done from either view. Menus in both surfaces offer clip operations such as edit, clone, duplicate pattern, rename, link management, and delete. A pattern dock in arrangement views gives quick access to the pattern library while editing the timeline.
1.6 Detail View
Detail View is Pooly’s deep editing view for a selected track, clip, and pattern. It opens when you edit clip content from the launcher or arrangement, and it adapts its layout to the track kind. On instrument tracks you get a piano roll, performance surface, and instrument parameter controls; on audio tracks the wave editor and audio core panel replace the note editor while sharing the same parameter and automation infrastructure.
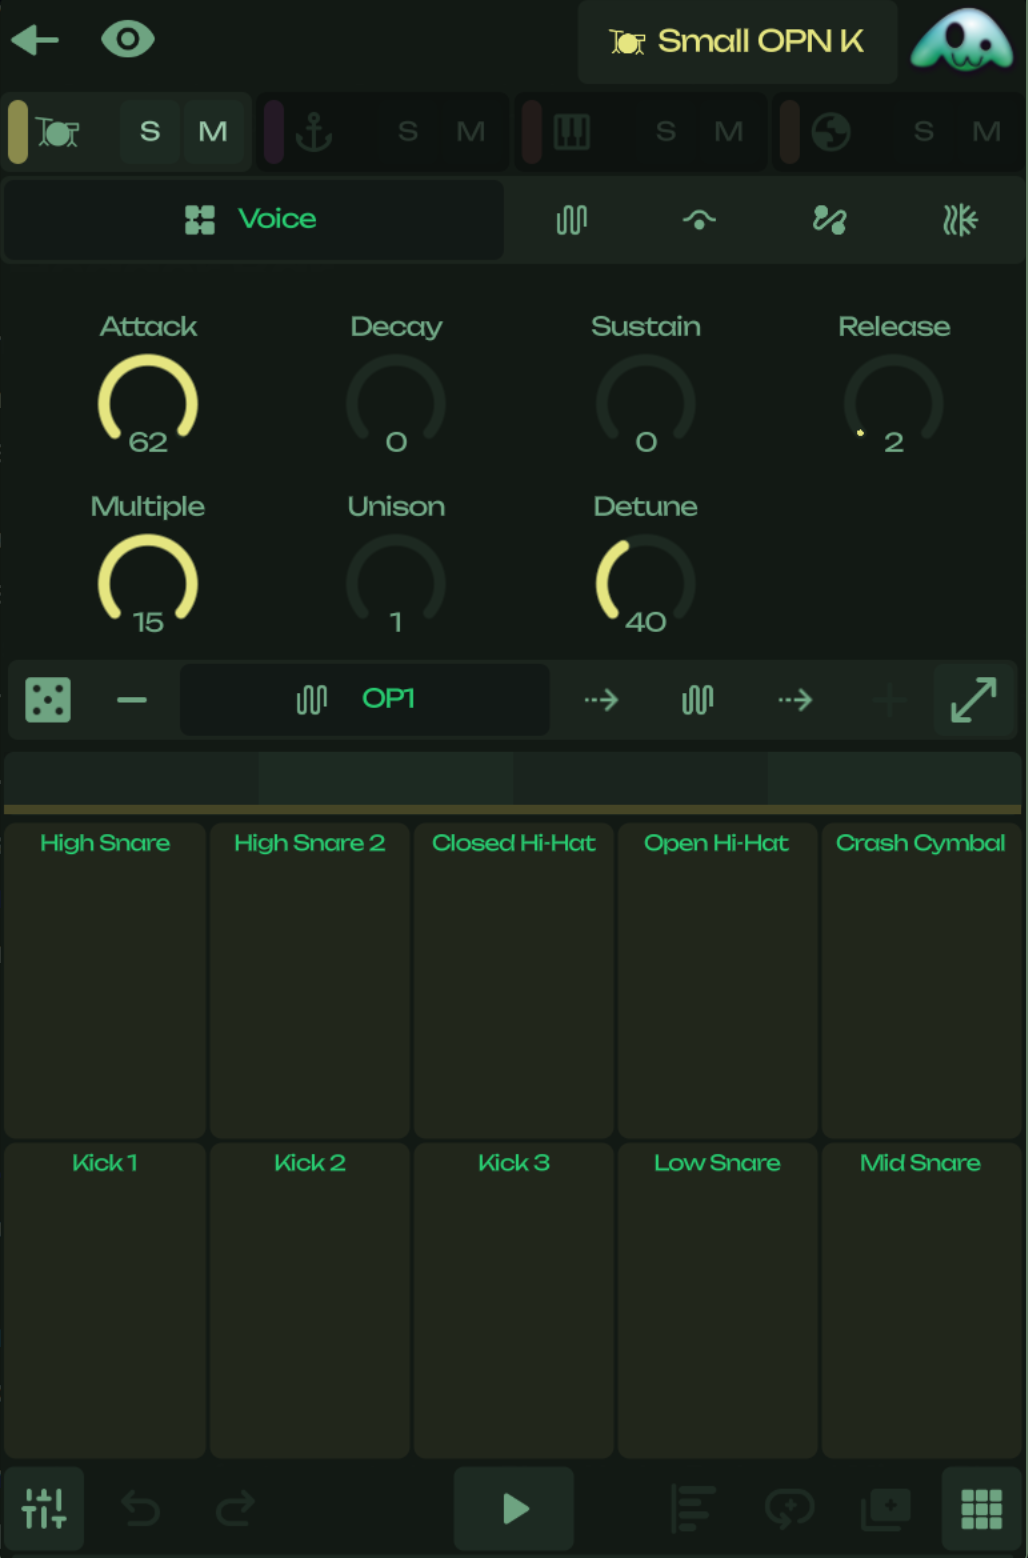
The view is organized into panels with tabs for voices, modulators, filters, envelopes, samples, and audio effects. You can expand panels to fullscreen for focused editing. Selecting the header title on an instrument track opens the instrument browser, where you swap synth voices, samplers, or drum kits from the preset library. A parallel browser mode selects effects for a chosen device in the chain.
Detail View coordinates editing states: an active clip or an empty track with no content yet. Footer buttons for pattern length, duplicate, and quantize enable only when a content-backed pattern exists. An automation control bar and lane overlay let you select targets, draw automation, and manage lanes without leaving the editor. Layout state is remembered separately for MIDI and audio track types so switching between them restores your last panel arrangement.
Musical building blocks
1.7 Tracks
A track is a lane in your project that owns a device chain, mixer settings, and all clips routed through it. Every track has a persistent numeric ID, a user-visible name, a color, and a kind that determines what content it accepts: Instrument tracks host synthesizers, samplers, or drum racks and play MIDI patterns, while Audio tracks host audio patterns backed by recorded or imported files.

Each track’s sound path runs through its device chain—the canonical store for devices, mixer parameters, routing, automation, and view state. When you add an instrument, the track name can update automatically to match unless you have renamed it yourself.
In the Launcher and Mixer, tracks appear as columns or channel strips with headers showing name, color, and context actions such as stop, duplicate, move, and delete. You add tracks with dedicated MIDI and Audio buttons at the edge of the launcher or mixer. Reordering tracks updates the grid and mixer together so clip slots and channel order remain aligned. In the Arranger, tracks can appear as rows or columns depending on the layout.
1.8 Audio and MIDI
Pooly works with two fundamentally different kinds of musical material. Audio is recorded waveform data. It can come from imported WAV or OGG files, recordings, or audio rendered inside the app. MIDI is symbolic performance data: instructions like “play this pitch at this time with this velocity,” closer to a score than a recording. MIDI by itself makes no sound; a device on the track must interpret it.
Instrument tracks translate MIDI into audio through playable devices such as FM synths, samplers, or drum racks. A sampler maps notes across one or many sounds; a drum rack maps each pad to its own sample or synth device. Audio tracks skip that step and play back audio patterns directly, with clip-level controls for gain, pan, warp mode, and warp markers to align material with the project tempo.
The track kind enforces compatibility: MIDI patterns belong on instrument tracks and audio patterns on audio tracks. You create each type with separate add-track controls in the Clip Launcher and Mixer. Clip Detail adapts its layout accordingly—piano roll and performance pads for MIDI, a wave editor and audio core panel for audio—while sharing parameter, automation, and device-editing surfaces where they apply.
1.9 Clips, Patterns, and Scenes
Pooly separates what you wrote from where it plays. A pattern is the authored musical content—MIDI notes on an instrument track, or audio file data on an audio track. A clip is an instance that places a pattern on a track, either in the Launcher grid or on the Arranger timeline. Multiple clips can reference the same pattern; when they are linked, edits propagate across all of them, and when unlinked each clip owns its own forked copy.
Scenes organize the Launcher into horizontal rows. Each scene row holds one slot per track; launching a scene triggers the clips in that row together, which is useful for song sections and live performance. Scene launch buttons sit beside the launcher grid and can be shown or hidden from the footer. Launch quantization is governed by the song’s launch-quantization setting so transitions land on musically sensible boundaries.
Understanding the distinction matters in practice. You edit note or audio content in Detail View, working on the underlying pattern. You launch and arrange music by manipulating clips—moving them in the launcher, placing them on the timeline, or triggering scenes. Patterns hold length, key/scale metadata, and embedded automation; clips add playback geometry such as start/end bounds, loop windows, and per-instance audio parameters.
1.10 Clips
A clip is the object that connects a pattern to a place in your project. It has a unique ID, references a pattern, and belongs to a track. Clips come in two kinds: launcher clips live in the Clip Launcher grid slots, and arranger clips sit on the timeline. The same pattern data can back multiple clips; the linked flag controls whether editing one clip’s pattern updates all linked siblings or forks a private copy on first edit.
Clips own playback geometry separate from the pattern’s authored length. Content bounds define which portion of the pattern plays. Loop bounds and clip loop state define cycling behavior during playback. Audio clips additionally store per-instance clip parameters and warp markers, so two clips referencing the same audio pattern can differ in gain, warp settings, or marker placement.
Clips also carry presentation metadata: an optional custom name and color override, and a disabled flag to mute them without deleting content. Arrangement and launcher views operate on clips; Detail View edits the pattern behind the selected clip.
1.11 MIDI Patterns
A MIDI pattern holds the note content for an instrument track. Notes are stored as structured events with pitch, position, length, velocity. Patterns declare an authored length, which defines the loopable content window shared by every clip that references the pattern.
MIDI patterns carry editing metadata used by the piano roll: scroll and zoom state, note row height, and quantization settings. Smart quantize biases note starts toward the previous grid step rather than the nearest one. Patterns also store optional key and scale indices that can override the song defaults for display and editing helpers in Detail View.
Embedded automation lanes live inside the pattern as an AutomationLaneSet, separate from device-chain automation. This lets you automate pattern-local targets alongside note data. When multiple clips share a linked pattern, a note edit in Detail View updates the underlying pattern for all linked instances; unlinking or forking creates an independent copy with its own ID.
1.12 Audio Patterns
An audio pattern represents a trimmed portion of an external audio file that plays as clip content on an audio track. It stores the file path, the file’s native duration and sample rate, and a dictionary of clip parameters such as gain, pan, pitch, and warp mode.
Warp mode controls how audio stretches to follow project tempo. Pooly supports several algorithms—off (no warping), repitch, tones, and texture—selected through the clip parameter UI. When warping is active, warp markers on the clip instance map between seconds in the source file and beats in the timeline, giving fine control over tempo-synced playback. Audio patterns can also carry embedded automation lanes for automating clip-level parameters over time.
Unlike MIDI patterns, audio patterns do not contain notes. Their musical identity is the underlying recording plus clip-instance geometry: content start/end bounds, loop windows, and per-clip parameter overrides stored on the Clip resource. Detail View’s wave editor is the primary surface for viewing and editing this material, while the audio core panel exposes the parameter set.
1.13 Devices
Devices are the building blocks of sound generation and processing in Pooly. Each track owns a device graph inside its device chain: an ordered graph of device nodes with parameters, routing, and runtime state. The device kind catalog classifies every device as playable (generates sound from MIDI), a rack (container for other devices), or an audio effect (processes audio downstream).
Playable leaf devices include synth and sampler instruments. Drum racks and instrument racks are container devices: a drum rack maps pads to child devices, while an instrument rack chains multiple instruments. Audio effects are drawn from the effect catalog—reverb, delay, filter, distortion, and others—and insert into the chain after the instrument path.
Audio flows from MIDI input through playable devices, then through any effects, then through the track mixer (volume, pan, mute, solo) before reaching the main output. You browse and swap instruments and effects from Pooly’s browser.
1.14 Presets
Presets are the saved sound identities Pooly uses to build runtime instruments. Pooly ships with a large factory library of instrument presets—FM voices, sampled instruments, drum kits, and more.
You choose presets through the instrument browser in Clip Detail. Browse by category and subcategory, search by name, and tap a preset to load it onto the current track’s device. You can also load effects for an existing device in the chain from the browser. Preset selection replaces the playable device configuration while preserving the track’s mixer and routing; parameter tweaks afterward are stored in the device’s canonical state, not in the preset file itself.
You can save new presets via the devices core panel, located in detail view.
1.15 Project Scale and Key
Every Pooly project has a root key and scale stored on the song. These defaults apply project-wide—for example, dtermining which note rows are availble for editing in the piano roll and informing editing helpers. You change them from Settings under the Project tab using the root-note and scale selectors. Changes propagate immediately through the the project, retuning all midi thoughout the project, this operation is undoable and deterministic.
Individual MIDI patterns can also store their own key and scale indices. When a pattern defines these values, Clip Detail prefers the pattern’s tonality for that clip’s editor; otherwise it falls back to the song defaults. This lets you write a passage in a borrowed mode without retuning the entire project, while still keeping a global key for new material and display consistency.
Scale and key are indexing into Pooly’s note and scale tables—they are not merely display labels. Altering the project scale in Settings updates the active editing context for tracks that inherit song defaults, including piano roll and related UI. Pattern-level overrides remain intact until you clear or change them on the pattern itself.
1.16 Automation
Automation records how a parameter changes across time so sound can evolve during playback without manual tweaking. Pooly stores automation in lanes, each targeting a specific parameter on a trackdevice, mixer, clip or pattern. Lanes contain points positioned in musical time.
Clip Detail exposes automation through an automation control bar and a lane overlay on the piano roll or wave editor: toggle the overlay, pick a lane, draw or edit points, mute lanes, or delete them.
Parameter Performances can be easily captured and written to a pattern as automation using the capture button in the footer. The captured automation is stored in the pattern’s automation lane set.
1.17 MIDI and Automation Capture
Capture is Pooly’s live recording buffer for live input. When you play MIDI notes or tweak automateable controls during playback, pooly accumulates events in a session rather than writing them immediately. Note capture records pitch, timing, velocity, and duration relative to the active clip or pending pattern slot. Automation capture records parameter changes against a selected target on the track.
A capture session stays open until you commit or discard it. While capturing, inactivity eventually freezes note input after roughly one bar without new notes—the buffer is preserved, not auto-committed. Starting playback clears any open capture session to avoid accidental merges. When material is ready, tap the capture button (a short press) to commit notes or automation points into the pattern and clear the buffer. Long-press the capture button to discard the buffer without committing.
The capture button appears only when there is something to commit. It sits in the footer and reflects buffer state visually—growing while you hold to clear, popping in when captured material exists. Committed capture respects the current clip link state and may materialize a new launcher clip when capturing into an empty slot.